


As an Amazon Associate, we earn from qualifying purchases. This post contains affiliate links, and buying through one costs you nothing extra.
Finding the quickest way to germinate seeds is often a mix of light, heat, and moisture control. Many beginners struggle with seeds that rot in cold soil or grow thin and weak from a lack of light. This guide helps you navigate the options, from basic trays to advanced kits with built-in heat and timers, so you can pick the right setup for your home. The Heated Seed Starter Kit is a great choice for most people because it combines essential heating and lighting in one simple, compact package.
What Actually Matters
Heat Control
Seeds often need specific temperatures to sprout. A built-in heating base, like the one in the Heated Seed Starter Kit, helps maintain warmth in chilly rooms. You can measure your room temperature to see if you need this extra boost. If your home stays cool, a dedicated mat like the VIVOSUN Seedling Heat Mat can also provide consistent bottom heat. Always check the manufacturer’s temperature range to ensure it matches your specific plant variety’s needs.
Lighting Spectrum
Seedlings need intense, close-up light to grow strong. Kits that offer full-spectrum light, such as the Seed Starter Grow Light, provide the energy plants need once they sprout. You should look for adjustable brightness or timers if you want to automate the process. The USDA National Institute of Food and Agriculture notes that light intensity and duration are crucial for healthy seedling development. A timer prevents you from forgetting to turn lights off, which helps keep growth cycles consistent.
Humidity and Airflow
Seeds need high humidity to crack open, but seedlings need airflow to prevent mold. Look for domes with adjustable vents. These allow you to start with high humidity and slowly open the vents as the plants grow. A clear dome is a must-have feature because it lets you see inside without lifting the lid and losing precious moisture. You can test your setup by watching for condensation on the underside of the lid; a light mist is usually perfect.
Medium and Drainage
The way you hold your seeds matters for root health. Peat pellets, like the MAQIHAN Peat Pellets, are simple because they expand with water and allow for easy transplanting. However, if you prefer using soil, ensure your trays have drainage holes. Excess water must escape to stop roots from sitting in soggy conditions, which can kill young sprouts. A good tray setup keeps the soil moist but never soaking wet.
1. Heated Seed Starter Kit

Best for: Beginners wanting an all-in-one heating and lighting solution.
This kit is designed for convenience by bundling the heat source and light into one unit. Because the heating base is built-in, you don’t have to buy a separate mat, which simplifies your setup. This is ideal for gardeners in cooler climates where room temperature isn’t enough to trigger germination. However, if you prefer to use your own specialized heat mat or a specific light, this all-in-one design might feel too restrictive.
The 36-cell layout is efficient for small spaces like windowsills. The adjustable vents on the humidity dome allow you to control airflow as your seeds transition from germination to seedling stage. It isn’t for someone who needs to start hundreds of seeds at once, as the compact design is limited to 36 cells per unit.
Pros
- Built-in bottom-warming base included.
- Compact size fits on windowsills.
- Adjustable air vents for humidity.
- Clear dome for easy monitoring.
Cons
- Fixed configuration limits customization.
- Limited to 36 cells total.
2. Seed Starter Grow Light

Best for: Gardeners who want advanced lighting modes and timers.
The standout feature here is the three-mode lighting system, which lets you match the spectrum to the growth stage. With a built-in timer, this kit is perfect for busy people who want to automate the light schedule without manual intervention. It offers more control than standard lights, making it versatile for both germination and early growth. If you only need a basic tray without complex electronic settings, this might have more features than you require.
The upgraded lid height provides extra room for seedlings to grow taller before they need to be moved. It’s a solid choice for someone who wants to take their plants from seed to a more advanced size before transplanting.
Pros
- Three distinct light color modes.
- Integrated 4-cycle timer setting.
- Five levels of brightness control.
- Extra height for taller seedlings.
Cons
- More complex to set up initially.
- Requires power for all features.
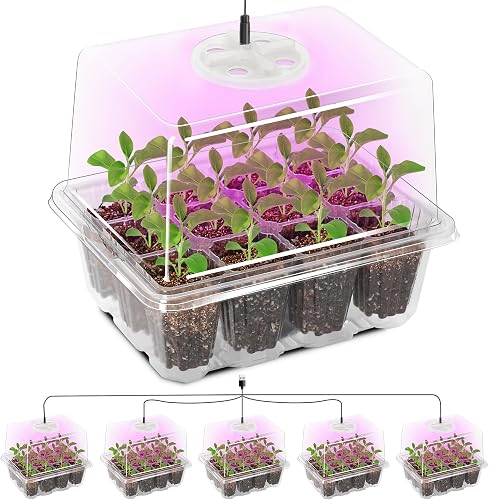
3. Bonviee Seed Starter Trays with 12-LED Grow Lights
Best for: Indoor growers needing a multi-tray setup.
This kit provides 60 cells across five separate trays, making it a great value for someone with multiple varieties to start. The USB-powered lights are simple to connect, though you’ll need to provide your own power adapter. It lacks a built-in timer, so you’ll need to manage the light duration yourself. This is a practical choice for a dedicated indoor growing station where you have the space to spread out the five trays.
The clear root-viewing design is helpful for beginners who want to see if roots are developing well before transplanting. It isn’t for those who want an automated, “set it and forget it” system, as it requires manual power management.
Pros
- Large 60-cell total capacity.
- Full-spectrum LED lighting included.
- Elevated domes for ventilation.
- Clear bases for root observation.
Cons
- No timer function included.
- Power adapter not supplied.
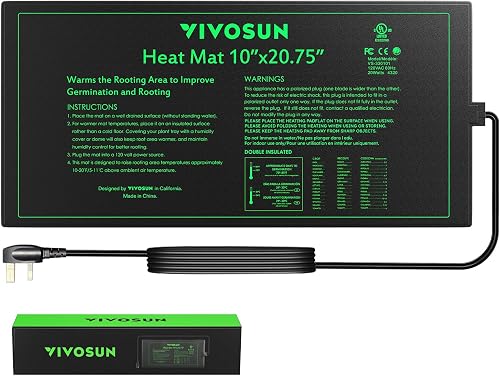
4. VIVOSUN 10″ x 20.75″ Durable Waterproof Seedling Heat Mat
Best for: Adding warmth to existing trays.
This is a professional-grade heating tool that’s built to last with durable, waterproof materials. It’s designed to fit standard 1020 trays perfectly, providing consistent far-infrared heat to speed up germination. It’s a great upgrade if you already have trays but find your seeds are sprouting too slowly due to cold temperatures. It doesn’t include trays or lights, so you must already have those items on hand.
The mat is flexible and easy to store when not in use. It isn’t for someone looking for a complete kit, as it’s strictly a heating component.
Pros
- Consistent far-infrared heating technology.
- Waterproof IP67 rated surface.
- Fits standard 1020 trays.
- Energy-efficient 20-watt operation.
Cons
- Trays and domes sold separately.
- Requires careful monitoring of temperature.
5. Seed Sprouter Tray

Best for: Quick, soil-free sprouting of beans and grains.
If you’re interested in growing sprouts for salads or sandwiches, this tray is the simplest way to do it. It uses a soil-free method, making it very clean and easy for children to use. It keeps moisture levels high, which is essential for rapid budding. It isn’t designed for traditional seed starting where you need to transplant seedlings into the garden later, as it’s meant for harvesting sprouts quickly.
Pros
- No soil or additives needed.
- BPA-free food-grade material.
- High budding rate for sprouts.
- Easy to clean and reuse.
Cons
- Not suitable for traditional seedlings.
- Limited to sprouting seeds and beans.
6. GARDENS ALIVE! Seed Sprouter Kit

Best for: Small-space vertical gardening.
The stackable design of this kit is perfect for someone with limited counter space who wants to grow multiple crops at once. It’s a hydroponic-style system that relies on water and time, meaning no messy soil is involved. It’s an excellent choice for a kitchen counter or office desk where you want fresh microgreens regularly.
Because the system is modular, you can stack up to four additional trays to sprout different seeds simultaneously. This allows you to propagate a new crop every week. If you need to produce a high volume of sprouts, use all available tiers. If you only need a small portion for a sandwich or salad, stick to the base two-tier setup.
It isn’t for growing large vegetables or deep-rooted plants, as the trays are quite shallow at 1.5 inches tall. Avoid planting crops that require substantial soil depth, as this kit is strictly for quick-growing sprouts like alfalfa, radish, or chia.
Pros
- Two-tier stackable design.
- Supports additional trays.
- Soil-free hydroponic setup.
- BPA-free and eco-friendly.
Cons
- Very shallow for larger plants.
- Limited capacity for root growth.
7. CARPATHEN Seed Starter Tray

Best for: Durability and long-term reuse.
This kit stands out for its high-quality, hard plastic construction, which feels more robust than standard thin trays. The extra-tall 4.7-inch dome is a major advantage, as it gives your seedlings plenty of vertical space to grow before they get crowded. It includes helpful tools like a dibber and scoop, making it a complete package for a serious hobbyist.
Pros
- Very durable, reusable plastic.
- Extra-tall humidity dome.
- Includes useful gardening tools.
- 40-cell insert for transplanting.
Cons
- Larger footprint than basic trays.
8. Back to The Roots 10-Cell Greenhouse Germination Kit

Best for: Eco-conscious gardeners.
Made from 75% recycled plastic, this kit is a great choice if you want to lower your environmental impact. It’s compact and designed specifically for ease of use, with a vented lid that helps manage humidity. It’s a good, straightforward kit for someone starting their first garden.
The system relies on a breathable, reusable tray and lid. Because the kit uses no glues or binders, it’s designed to grow strong, healthy roots. It isn’t for someone who needs a large-scale system, as the 10-cell capacity is quite small. If you aren’t satisfied, the company offers a 100% guarantee to grow. You can contact their support team for a refund or replacement if you face issues.
Pros
- Made from 75% recycled plastic.
- Includes vented greenhouse lid.
- Biodegradable pots are compatible.
- Simple, beginner-friendly design.
- Includes #GrowOneGiveOne donation program.
Cons
- Small 10-cell capacity.
- Limited features compared to larger kits.
9. MAQIHAN 50PCS Peat Pellets

Best for: Effortless transplanting.
These pellets are the ultimate in convenience. You simply add water, let them expand, and sow your seeds. The mesh wrapping holds the soil together, which makes moving your seedlings into the garden extremely easy and stress-free for the plant. They’re a great choice for beginners who want to avoid the mess of handling loose soil. They aren’t for someone who wants to reuse their growing medium, as these are meant to be planted directly into the ground.
Pros
- Very easy to store and carry.
- Simplifies the transplanting process.
- Mesh allows for healthy roots.
- No fertilization required initially.
Cons
- Single-use growing medium.
- Requires a tray for support.
10. Back to the Roots 3-in-1 Seed Starting Mix 6 Quarts

Best for: Providing the best start for your seeds.
This seed-starting mix is nutrient-rich and peat-free, making it a strong choice for environmentally aware gardeners. It includes beneficial mycorrhizae, coconut coir, and yucca extract to help roots establish quickly and improve water uptake. The mix also features dolomitic limestone, which balances pH levels to prevent nutrient deficiencies.
It’s an excellent choice to fill any of the trays mentioned in this article. However, it isn’t a complete germination system, so you must purchase trays or pots separately. If you’re unsure whether to choose this, look for the “Grow One Give One” campaign tag; sharing your results on social media can trigger a kit donation to a classroom.
Pros
- 100% organic and peat-free.
- Includes beneficial mycorrhizae.
- Balances pH for better growth.
- Specifically formulated for seeds.
Cons
- Must buy trays separately.
- Doesn’t include any hardware.
Who Should Buy Which
If you’re a beginner seeking a straightforward, all-in-one experience, the DZLight Heated Seed Starter Kit is your best choice. It integrates a bottom-warming base, grow light, and humidity dome, eliminating the need for separate heat mats.
For those who need to manage lighting schedules automatically, the Ourhom Seed Starter Grow Light is superior. It features a 4-cycle timer and adjustable brightness, which prevents the need for manually toggling lights.
Gardeners with limited space who want to grow microgreens will find the GARDENS ALIVE! Sprouter Kit highly effective, as it requires no soil. If you prioritize durability, choose the CARPATHEN Seed Starter Tray; its reinforced base and extra-tall 4.7-inch dome are built for multiple planting cycles.
If you struggle with transplanting, MAQIHAN Peat Pellets are a life-saver, as they allow you to plant directly into the soil. Finally, if you have hardware but need a better medium, the Back to the Roots Mix provides essential nutrients for any seeds you choose to plant.
Mistakes That Catch Buyers Out
-
Choosing a kit with too few cells for your project. If you plan to start many varieties, look for modular options that offer 36 to 120 cells total.
-
Assuming all grow lights are identical. Some systems offer basic illumination, while others feature full-spectrum LEDs with adjustable brightness and timers to match specific growth stages.
-
Ignoring the dome height. A shallow lid may force you to transplant early. Opt for extra-tall domes if you intend to keep seedlings in the tray for longer development.
-
Using a heating mat blindly. While some kits reach 104°F to support warm-season germination, others don’t require supplemental heat. Always verify the needs of your specific seed variety.
-
Neglecting humidity control. If your tray lacks adjustable vents, you can’t regulate airflow as seedlings emerge, which risks poor development.
Frequently Asked Questions
Do I need to use a heating mat for all seeds?
Not all seeds require extra heat. Many cool-season vegetables, like lettuce or kale, germinate well at room temperature. However, warm-season crops like peppers, tomatoes, and many flowers benefit greatly from the extra warmth provided by a mat. Always check your seed packet for the ideal germination temperature. If your home is consistently below 65°F, using a mat will significantly speed up the process for most tropical or warm-season varieties.
How do I know when to remove the humidity dome?
You should remove the dome once you see the majority of your seeds have sprouted. Keeping the dome on for too long after germination can lead to high humidity and poor airflow, which encourages mold or “damping off” disease. If you’re worried about the seedlings drying out, remove the dome gradually over a few days, or open the vents fully to help them acclimate to the lower humidity of the room.
Can I reuse my seed starter trays?
Yes, most hard plastic trays can be reused for many seasons. To keep them in good condition, wash them with mild soap and water after each use to remove soil and prevent the buildup of bacteria. Avoid using harsh chemicals, as the manufacturer only recommends mild soap. If you use peat pellets or biodegradable pots, these are intended for single use and should be planted directly into the ground with the seedling.
How deep should I plant my seeds?
A general rule is to plant seeds at a depth equal to two or three times their diameter. Very small seeds, such as lettuce or petunias, often need light to germinate and should be barely covered or just pressed into the surface of the soil. If you plant them too deep, they may run out of energy before they reach the surface. Always check the specific instructions on your seed packet.
Why are my seedlings tall and “leggy”?
Leggy seedlings occur when plants do not receive sufficient light, causing them to stretch in search of a better source. To prevent this, position grow lights as close to the seedlings as possible without burning the leaves. If plants are already leggy, move them closer to the light source immediately to encourage sturdier growth.
Conclusion
The Heated Seed Starter Kit is the most reliable way to get started, as it removes the guesswork by combining heat and light. Before you order, check your available space to ensure you have room for the trays and enough power outlets nearby for your equipment. Taking these small steps will ensure your seeds have the best environment to germinate quickly and grow into healthy, strong plants.
{“@context”:”https://schema.org”,”@type”:”FAQPage”,”mainEntity”:[{“@type”:”Question”,”name”:”Do I need to use a heating mat for all seeds?”,”acceptedAnswer”:{“@type”:”Answer”,”text”:”Not all seeds require extra heat. Many cool-season vegetables, like lettuce or kale, germinate well at room temperature. However, warm-season crops like peppers, tomatoes, and many flowers benefit greatly from the extra warmth provided by a mat. Always check your seed packet for the ideal germination temperature. If your home is consistently below 65°F, using a mat will significantly speed up the process for most tropical or warm-season varieties.”}},{“@type”:”Question”,”name”:”How do I know when to remove the humidity dome?”,”acceptedAnswer”:{“@type”:”Answer”,”text”:”You should remove the dome once you see the majority of your seeds have sprouted. Keeping the dome on for too long after germination can lead to high humidity and poor airflow, which encourages mold or \”damping off\” disease. If you’re worried about the seedlings drying out, remove the dome gradually over a few days, or open the vents fully to help them acclimate to the lower humidity of the room.”}},{“@type”:”Question”,”name”:”Can I reuse my seed starter trays?”,”acceptedAnswer”:{“@type”:”Answer”,”text”:”Yes, most hard plastic trays can be reused for many seasons. To keep them in good condition, wash them with mild soap and water after each use to remove soil and prevent the buildup of bacteria. Avoid using harsh chemicals, as the manufacturer only recommends mild soap. If you use peat pellets or biodegradable pots, these are intended for single use and should be planted directly into the ground with the seedling.”}},{“@type”:”Question”,”name”:”How deep should I plant my seeds?”,”acceptedAnswer”:{“@type”:”Answer”,”text”:”A general rule is to plant seeds at a depth equal to two or three times their diameter. Very small seeds, such as lettuce or petunias, often need light to germinate and should be barely covered or just pressed into the surface of the soil. If you plant them too deep, they may run out of energy before they reach the surface. Always check the specific instructions on your seed packet.”}},{“@type”:”Question”,”name”:”Why are my seedlings tall and \”leggy\”?”,”acceptedAnswer”:{“@type”:”Answer”,”text”:”Leggy seedlings occur when plants do not receive sufficient light, causing them to stretch in search of a better source. To prevent this, position grow lights as close to the seedlings as possible without burning the leaves. If plants are already leggy, move them closer to the light source immediately to encourage sturdier growth.”}}]}


